Saturday, August 27, 2011

Fall Blog Hop!


If you've arrived to my blog from the Fall Blog Hop...WELCOME! I'm the last stop on the hop! You should've arrived here from Tracy's wonderful blog...Scrappin' in the woods with a Bug!

For my Fall project, I came up with a really easy idea for some Fall decor...I made my own decorative blocks! (Click on the pictures to view them larger.)


Materials Used:
Cricut Cartridges - Sweet Tooth Boxes, Sophisticated and Gypsy Wanderings
Paper - Tim Holtz
Hambly Grid Overlay

The blocks are cut from the Sweet Tooth cartridge using the CubeBox at 10.5" (just the box part, not the top). I used my Gypsy to add the letters before I cut it. The letters are from the Sophisticated cartridge, the upper case font. I stretched them a little to fill the space (width was 2.59" and height was 2.54"). (Tip...do a test cut first...the boxes are turned upside down when finished so you want the letters facing the right direction!)

The leaves are cut from the Gypsy Wanderings cartridge and attached with foam dots for dimension.

The Hambly overlay was cut by hand and applied to the inside of the letters.

It was so simple to put together!

Thank you for stopping by...and, I hope you've enjoyed our Fall Blog Hop! If you'd like to start again at the beginning...please go HERE to Kristen's My Fantabulous Life Blog!

Thursday, August 25, 2011

Neighborhood Party Invite!

Here's my latest assignment for the Creative Critterz Imaginations blog. It's a party invitation...to hang on the neighbors door knobs.


All the details are on the Creative Critterz Imaginations Blog! Come check out all the great projects this week!

Tuesday, August 23, 2011

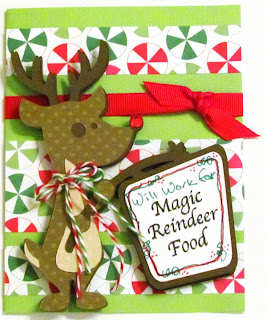
Will work for...Magic Reindeer Food!

Here's my latest project for the My Pink Stamper design team! I made this card using one of Robyn's stamps from the Winter Treats & Sayings set. It's such a cute set, and it has so many great sayings on it!


My reindeer is from the cricut cartridge called Campin' Critters. He's usually holding a branch with fishing line attached and a fish on the end of his line...instead, I used my gypsy to weld a sign to the branch, covering over the fish, to create my sign saying "Will work for...Magic Reindeer Food".


Materials used:
Cardstock - Bazzill for the Green, Dark Brown, Brown Dot and Tan Dot, American Crafts for the White
Patterned Paper - Pebbles Inc.
Bakers Twine
Red Ribbon
Red Crystal for nose


Cricut Cartridge - Campin' Critters (deer and layers cut at 4.75")


Check out the My Pink Stamper website for lots of other great inspiration using Robyn's fantastic new stamp sets!!

Friday, August 12, 2011

My Pink Stamper...Pinkalicious Blog Hop!!!

Hi everyone! I'm Sharon and this is my first Pinkalicious blog hop as a design team member for My Pink Stamper! I'm so excited to be a part of this.


The project I created for the blog hop is a Halloween layout. I'm a scrapbooker and I love finding ways to use stamps on my layouts! I used two stamps from Robyn's Spook-alicious set to create borders for my layout! 'Trick or Treat' was used on the top border and 'Smell my feet!' was used on the bottom border. I love this stamp set...it has so many cute stamps in it! (Click on the pictures to see them larger!)


Materials Used:
Patterned Paper - DCWV Ghosts & Goblins (Orange, Bats, and Ghosts), Lush (Black Dots)
Cardstock - Bazzill (Green), American Crafts (White...filled with black on the Imagine for frame)
Cricut Cartridges - Teresa Collins Sophisticated (Frame & Shadow), Straight from the Nest (Green blob!)
Stamp Set - My Pink Stamper Spook-alicious
Ghosts - hand cut from Ghost patterned paper (DCWV)...inked around edges
Ink - Memento Tuxedo Black


Thanks for stopping by on the hop! Have fun hopping to the next spot for even more inspiration!


My Pinkalicious Blog Hop Friday - Blog List


Robyn
Andrea
Carissa
Agnes
Chelle
Alex
June
Angela
Missy
Courtney
Renee
Cristi
Roberta
Edna
Sharon - You are HERE!
Helen - HOP Here Next!
Julie
Kassidy
Michelle
Shelley
Tracy
Maria

Thursday, August 11, 2011

Family Time Layout for Creative Critterz Imaginations!


I made this layout for a Design Team assignment at the Creative Critterz Imaginations blog! Details are on their blog if you'd like more information about it.


Thanks for stopping by!

Monday, August 8, 2011

Back to School Layout!

As part of the design team for My Pink Stamper, I get to play with Robyn's new stamp releases! I really love them all! The 'Back to School' stamp on this layout is from the School Days set.


Materials Used:
Background Paper - Basic Grey
Cardstock - American Crafts white, and DCWV for photo mats
Cricut Imagine - Preloaded circle (and shadow) - filled with patterns from Hopscotch
Cricut Shapes - Pencil from Smiley Cards, 3rd grade from Locker Talk, Kelsey from Lyrical Letters
Back to School stamp - My Pink Stamper School Days set

Thursday, August 4, 2011

Creative Critterz Imaginations - First Project!

I'll be posting my design team projects for Creative Critterz Imaginations on their blog on Thursdays! Today is my first post!! The assignment was to make a card using a Cute Critter!

Here's the card I made:


For details on my project, come on over to the Creative Critterz Imaginations blog!

Wednesday, August 3, 2011

A clean, simple layout!

Sometimes, a simple approach is all you need to tell the story.

A couple strips of paper, a few cricut flowers (with brads for the centers)...easy, simple, done!

I have 2 sayings when it comes to scrapbooking.

#1 - I have more photos than time. (I gave up on the idea of getting caught up long ago. Now, I scrap what makes me happy!)

#2 - Done is better than perfect!